Omarchy 2.0 - Understanding SSH and Yubikeys
This post has nothing directly to do with Omarchy, but I decided to include it in the same series because it’s an important tip for programmers.
Every programmer needs to know how to manage their SSH keys. At the very least because every GitHub account requires one.
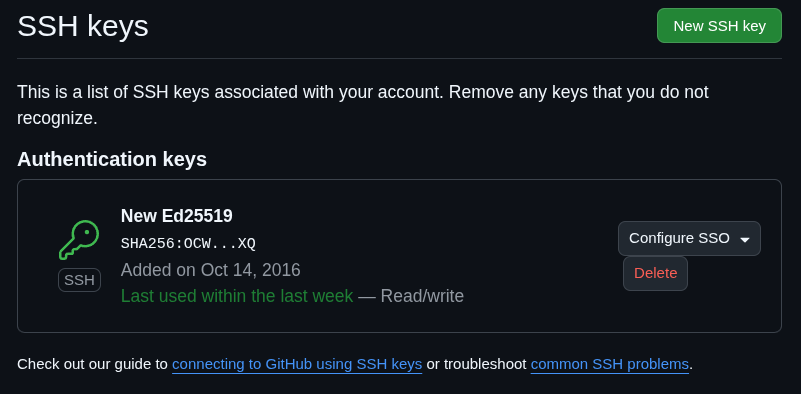
Every time you run git push to one of your repositories, it will ask for the passphrase of that key:
❯ git push origin master
Enter passphrase for key '/home/akitaonrails/.ssh/id_ed25519':
What does this mean?
SSH is a set of tools, both client and server, to create a secure, encrypted connection over the internet. It has several uses and I explained how to do SSH Proxy in this video:
The whole process starts by installing SSH on your machine, and on Omarchy/ArchLinux you just do this:
yay -S opensshIf you’ve never created a key pair (yes, it’s a pair), just run this command:
ssh-keygen -t ed25519 -a 100 -C "your_email@example.com" -f ~/.ssh/id_ed25519ED25519 is a public-key algorithm, meaning it creates a pair of keys: a private one that must never leave your machine, and a public one that can be exposed on the open internet (the one you register on your GitHub account, for example). I explained public keys in this other video:
ED25519 is a more modern algorithm than the old RSA (which I think is still the default in ssh-keygen if you don’t make an explicit choice — it’s still secure, but elliptic curve is even more secure).
It’s based on elliptic curve cryptography (ECC). For the paranoid, yes, it’s even considered quantum-resistant, meaning that even if a quantum computer became feasible, it wouldn’t be able to break an ED25519 key.
Two files will be created after running ssh-keygen:
.rw------- 464 akitaonrails 14 Nov 2017 id_ed25519
.rw-r--r-- 108 akitaonrails 14 Nov 2017 id_ed25519.pubPay attention to the permissions of these files. It’s important that the ~/.ssh directory and the private key files inside it always have 600 permission, meaning read-write only for your user, and no permission for groups or any other user. Nobody else should even be able to list the directory.
The *.pub files, which are the public keys, have 644 permission, which is read-write for you and read-only for other groups and users. As I said, the public key can be exposed publicly. Mine, for example, is this one:
❯ cat id_ed25519.pub
ssh-ed25519 AAAAC3NzaC1lZDI1NTE5AAAAIEWG5bHK02sMqilMiYu67xqdaBsk3TtCQ564bcJibDiO akitaonrails@Miner42.local
ED25519 has another advantage: it’s orders of magnitude more secure than RSA and still provides a much shorter public key, which makes copy-pasting it around much easier.
A private key has an envelope in this format:
-----BEGIN RSA PRIVATE KEY-----
MIIEpA ...
...
XfI0X....
...
... nQ5w==
-----END RSA PRIVATE KEY-----
Repeating: THIS FILE MUST NEVER LEAVE YOUR MACHINE. Never leave it lying around on a pen drive, for example. And always make sure the permission is chmod 600 as I explained.
Yubikey 5
The most secure form, one that many companies even enforce, is the use of a HARDWARE-KEY. The private key is never written to your local machine; instead, it’s generated inside secure hardware from which it’s impossible to read that private key. Examples are Yubikey or FIDO2.
About Yubikey, be careful, you want the newer Yubikey Series 5 models:
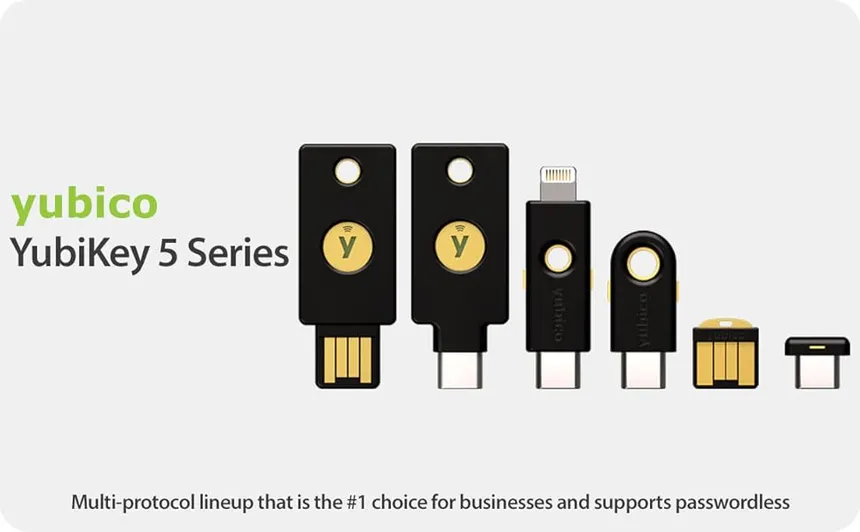
If you have the old one — usually the blue one — it’s the Security Key v4.3.1 and only supports U2F (FIDO U2F) but not FIDO2/WebAuthn, and no PIV/OpenPGP/OTP applets. To be sure, install these packages on your Arch:
sudo pacman -S yubikey-manager libfido2Then check with this command:
❯ ykman info
WARNING: PC/SC not available. Smart card (CCID) protocols will not function.
Device type: FIDO U2F Security Key
Firmware version: 4.3.1
Enabled USB interfaces: FIDO

Applications
Yubico OTP   Not available
FIDO U2F     Enabled
FIDO2        Not available
OATH         Not available
PIV          Not available
OpenPGP      Not available
YubiHSM Auth Not available
See how it finds the Yubikey connected via USB but everything shows up as “Not available”. That’s the wrong model — this Yubikey only works as Two-Factor Authentication on websites. It’s not useless, but for our case it doesn’t work because:
- it has no PIV applet, so it can’t act as a smartcard
- it has no OpenPGP applet, so it can’t store GPG or SSH private keys
- it has no FIDO2, so you can’t run
ssh-keygen -t ed25519-sk.
A new one, on Mercado Livre today, costs around BRL 800. If you’re going to use it for work per the company’s security policy, they should provide it or reimburse you. But even for personal use, I recommend investing a bit more in security.
With a Yubikey 5 in hand, the procedure is as follows. Start by making sure you have the packages on your machine:
sudo pacman -S yubikey-manager yubico-piv-tool openscInitialize the PIV application by changing the PIN:
ykman piv reset                # wipes PIV, careful
ykman piv access change-pin    # default PIN is 123456
ykman piv access change-puk    # default PUK is 12345678
Generate a new key pair inside the Yubikey:
ykman piv keys generate 9a pubkey.pemExtract only the public key to your local ~/.ssh directory:
ssh-keygen -D /usr/lib/opensc-pkcs11.so -e > ~/.ssh/id_yubikey.pubThe contents of that ~/.ssh/id_yubikey.pub file is what you’ll add to the ~/.ssh/authorized_keys file on the remote server you want to connect to via SSH. To open an SSH connection to it, plug the Yubikey into the USB port and run:
ssh -I /usr/lib/opensc-pkcs11.so your-user@serverIt will ask for your PIN and authorize the connection. If you don’t want to keep typing that -I every time, just edit ~/.ssh/config with this:
# ~/.ssh/config
Host server
  PKCS11Provider /usr/lib/opensc-pkcs11.so
  User your-user
HOWEVER
This procedure uses the key generator inside the Yubikey, which only supports RSA (1024–2048) or ECC (P-256, P-384). If you want to generate an ED25519 key, the flow is different, we have to run it like this:
ssh-keygen -t ed25519-sk -a 100 -C "you@example.com" -f ~/.ssh/id_ed25519_skThe id_ed25519_sk file that it generates on your local machine is not the private key, it’s just a “stub” that points to your Yubikey. So the key stays stored in the hardware and never passes through your machine.
To add your public key to the remote server, just manually append it to the ~/.ssh/authorized_keys file as we did before, or run this command to log in with your password and it will add the public key for you:
ssh-copy-id -i ~/.ssh/id_ed25519_sk.pub your-user@serverTo use your key to log in now, just do:
ssh -i ~/.ssh/id_ed25519_sk your-user@serverThis only works because the Yubikey 5 has FIDO2 support. The old ones don’t, which is why you can’t do this with them.
Oh, and on your home server or any other server, AFTER adding your key to authorized_keys, I recommend DISABLING the password login option (so that no bot keeps trying to brute-force its way in). On the server, edit:
# /etc/ssh/sshd_config
PasswordAuthentication no
ChallengeResponseAuthentication no
KbdInteractiveAuthentication no
UsePAM no
...
PubkeyAuthentication yes
In other words, turn off all login options and leave only public-key. Now just restart the service:
sudo systemctl restart sshdSSH-Agent
To be clear: the most secure way to manage private keys is via an external security hardware device, in this case the Yubikey 5.
But it’s not mandatory. If you have a dedicated PC for work, with your Arch Linux or Omarchy installed, and you don’t keep installing shady software — like pirated games — nor keep browsing sketchy sites and clicking on random links (malware risk), keeping your keys locally on your machine isn’t entirely bad. I’ve been using it this way for years and have never had problems — because I’m paranoid about the security of my machine.
Remember, one of the most common types of malware are the ones that upload your files, or encrypt your files and then demand a cryptocurrency ransom to return them. The good old RANSOMWARE:
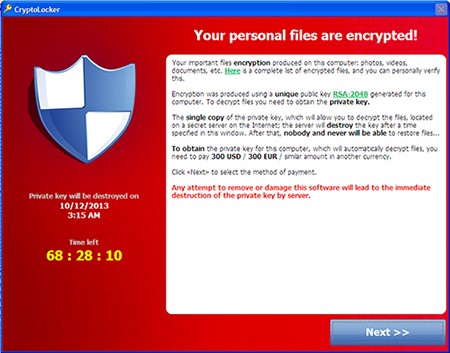
This exists not only on Windows but on Mac and Linux as well. And web browsers are the main vector, especially phishing emails with malicious links that you click on, or links that come through Discord, Telegram, or WhatsApp channels.
NEVER CLICK ON LINKS. Copy the link, paste it into a terminal, and see what kind of link it is. If it’s not an obviously official domain like “whatspp.com” or “google.com”, don’t go forward.
With all that said. Let’s say you created your keys locally and registered them in your server’s authorized_keys and in your GitHub account. Now, every time you run ssh or git push, it will ask you to type your passphrase (which, if you’re not silly, you made VERY LONG).
This is extremely inconvenient to keep typing all the time. That’s why SSH has a feature to help: caching your authentication for a fixed period using ssh-agent.
Start by creating this user service for systemd:
# ~/.config/systemd/user/ssh-agent.service
[Unit]
Description=SSH Agent

[Service]
Type=simple
Environment=SSH_AUTH_SOCK=%t/ssh-agent.socket
ExecStart=/usr/bin/ssh-agent -D -a $SSH_AUTH_SOCK

[Install]
WantedBy=default.target
Enable it with your user privileges (no sudo):
systemctl --user enable --now ssh-agent.serviceExpose it in your .bashrc or .zshrc:
# ~/.zshenv (or ~/.profile)
export SSH_AUTH_SOCK="$XDG_RUNTIME_DIR/ssh-agent.socket"
Now, every time you log into your system and start working, add your work key:
ssh-add -t 30m ~/.ssh/id_ed25519It will ask for your passphrase once, but for 30 minutes (which is what the -t 30m option does), you won’t need to re-type the passphrase and can comfortably keep accessing ssh or doing git push.
If you want to remove the cache from the agent before the timeout, you can do:
ssh-add -d ~/.ssh/id_ed25519If your work routine involves using ssh, instead of manually running ssh-add you can add the following configuration to your ~/.ssh/config:
# ~/.ssh/config
Host *
  AddKeysToAgent yes
  IdentitiesOnly yes
  IdentityFile ~/.ssh/id_ed25519
And every time you open the terminal, it will ask you to type your passphrase. And that will last while your session is logged in.
Finally, the filename in the examples is always id_ed25519, but that has no relevance whatsoever — you can rename it however you want and even create multiple keys to use for separate services if you want to be extra secure. Just generate keys like heroku_id_ed25519 or google_cloud_id_ed25519 and so on. Create as many keys as you want or think necessary. This applies both to local keys and to keys on the Yubikey 5.
I think these are the aspects I consider most important to know about SSH keys. Did I forget anything else important? Feel free to share more tips in the comments below.