Generating AI Images - even Ghibli style 😂 - with Docker and CUDA
This topic will be split into two posts. This one is purely technical, about how to get it running. In the other one I’ll explain what the heck ComfyUI is and roughly how to use it.
More than a year ago, when I made my last videos about A.I. and on the podcasts, I always said I ran everything on my own machine. But I never detailed how. So today I fixed that with several blog posts and little projects on GitHub with Dockerfiles so you can run it on your own machine, without configuring anything difficult.
I finally made a Dockerfile for ComfyUI, which is the best graphical interface for editing image generation workflows. If you’ve ever worked with Davinci Resolve Fusion or Blender Geometry Nodes and the like, workflows are basically node configurations to process your images, audio, video and pipe them through processing steps, not just A.I. ones. It’s like programming visually. That’s why it’s a much more complicated tool than the FramePack I showed in the previous post. You don’t just click and go.
Recently everyone went hysterical with the ChatGPT updates and how it “OH MY GOD” can generate Ghibli anime style images, and they kept spamming the world with idiotic anime-style memes. Online hysteria is really annoying. But as I said, as impressive as it is, that’s all it is: a meme generator. You can’t use it professionally.
I’m tired of trying to upload my own photos, or even generic photos, fictional characters, sometimes drawings of mine, and randomly ChatGPT just refuses to generate the image. Claiming privacy, security, copyright and whatever else it can invent as an excuse. You can’t rely on this for work. Anyone who’s a professional should have full control over the process, and that’s what I’m going to teach today.
To start, clone my GitHub repository and follow the README instructions or do this:
git clone https://github.com/akitaonrails/ComfyUI-Docker-CUDA-preloaded.git
cd ComfyUI-Docker-CUDA-preloaded
docker compose build
Since it’s more complex, this time I had to put together a Docker Compose. So to bring it up, after the build finishes, just do this:
docker compose upNow it’s going to take a while, because by default it will download almost 500GB of pre-trained models so it can do almost anything image-related. Yes, to play with A.I. locally you need infrastructure. Otherwise, rent a beefy machine with lots of storage on a RunPod or similar and run it remotely. You can download fewer models, I’ll explain that next.
On Docker Compose. I recommend avoiding the “-d” option to bring it up as a daemon, because it’s good to reserve a terminal to keep watching the outputs (you can run docker compose logs --follow if you want, but it’s easier directly).
ComfyUI is a more complex program than average, much more so than something like FramePack. It supports installing “extensions” (plugins, addons, call them what you want). And honestly on its own it doesn’t do much, you need to install several extensions for it to start being really useful. Every now and then one of these extensions doesn’t handle errors properly and blows up in the console, something like this:

It’s always useful to keep an eye on the console to find out if it tried to load a file that doesn’t exist. Then you can grab the file name and search Google, download it and put it in the right place. Or if it’s a really buggy extension that’s better off removed from the “custom_nodes” directory, and so on. Without watching the console, it doesn’t show up in the web interface and you’ll be left in the dark.
A lot of the models and extensions I based on the Ultimate ComfyUI version 3 configuration recommended by Aitrepreneur, again. Watch this video of his to get all the details and everything that’s possible to do. He has the scripts for Linux, Windows, and the workflows in his paid Patreon version and, of course, I won’t share the workflows because they’re not mine. In theory, my config should be able to do what he teaches.
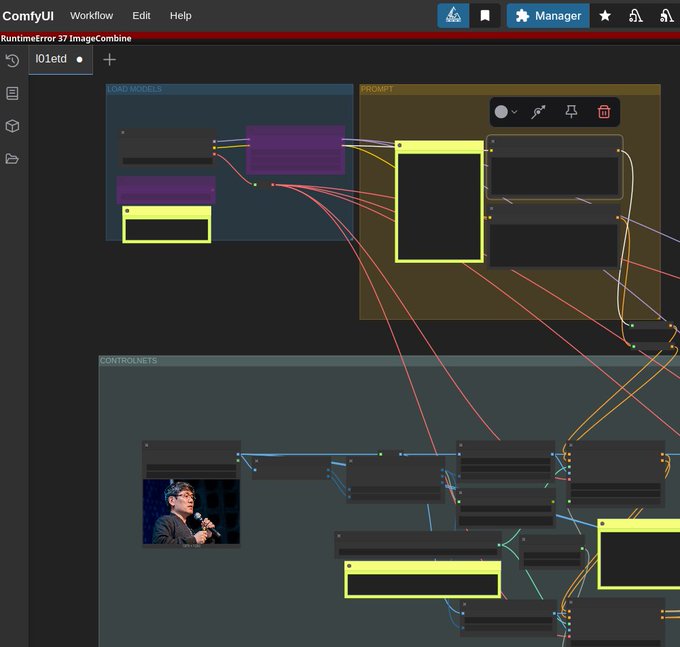
Aitrepreneur’s V3 workflow is really badass. But I can’t share it because it’s closed material on his Patreon, but here’s a screenshot of my ComfyUI with all of his stuff loaded:

But the config itself, I redid it entirely to work in this Docker. You can load any other open workflow you find on a Reddit or wherever.
Here’s what I did:
Models
In the project there has to be a “models” directory, if there isn’t one, create it, because docker compose will map it inside the container. When it starts, it’ll run the file init_models.sh. This script will load a configuration file you can edit later: models.conf. It’s huge and a piece of it looks like this:
...
[CONTROLNET]
https://huggingface.co/XLabs-AI/flux-controlnet-collections/resolve/main/flux-canny-controlnet-v3.safetensors
https://huggingface.co/XLabs-AI/flux-controlnet-collections/resolve/main/flux-depth-controlnet-v3.safetensors
https://huggingface.co/brad-twinkl/controlnet-union-sdxl-1.0-promax/resolve/main/diffusion_pytorch_model.safetensors|controlnet-union-sdxl-1.0-promax.safetensors
https://huggingface.co/lllyasviel/ControlNet-v1-1/resolve/main/control_v11p_sd15_canny.pth
https://huggingface.co/lllyasviel/ControlNet-v1-1/resolve/main/control_v11f1p_sd15_depth.pth
https://huggingface.co/lllyasviel/ControlNet-v1-1/resolve/main/control_v11p_sd15_openpose.pth
https://huggingface.co/Aitrepreneur/FLX/resolve/main/Shakker-LabsFLUX1-dev-ControlNet-Union-Pro.safetensors

[STYLE_MODELS]
https://huggingface.co/Aitrepreneur/FLX/resolve/main/flux1-redux-dev.safetensors

[SAMS]
https://huggingface.co/Aitrepreneur/FLX/resolve/main/sam_vit_b_01ec64.pth
Each section maps to a sub-directory, so “[SAMS]” will map to “models/sams” and download the binaries to the right places. There are some special ones in the “[GIT_REPOS]” section, for those that can be cloned via git, or “[CUSTOM]” for files you need to download later inside those cloned projects, for example. I don’t yet know if it can be simplified, but I picked this up from Aitrepreneur’s config.
The ideal is to always keep this list organized with models you find later. If you want to contribute, that would also be cool. The reason is that everything is scattered across all kinds of sites out there, you download manually, then move to the directory inside “models”. Tomorrow, if you reinstall your machine, how are you supposed to remember all the sites? There are dozens of available models.
In the next post I’ll try to summarize what the hell “checkpoints”, “diffusion models”, “loras”, “controlnet” and all the rest are. But for now, the file extension doesn’t say much. “.pt” for example only means it’s a file PyTorch can open, but it doesn’t tell you whether it’s a clip or a text encoder, for example. Same thing with “.safetensors”, it can be anything, and ComfyUI needs each file to be in the correct sub-directory in order to use it, you can’t just go around moving files randomly.
The “init_models.sh” script runs every time Docker is restarted and is smart enough to only download URLs that aren’t already downloaded in the “models” directory. That’s why it always runs when the container comes up, in the entrypoint. That’s one of the advantages of my config: it has automatic maintenance.
Extensions and Dependencies
I made a second script called init_extensions.sh, which also runs at the container’s entrypoint and which you shouldn’t touch, but it loads another configuration file called extensions.conf and that one, yes, you can mess with and add new extensions later. A piece of it looks like this:
[EXTENSIONS]
https://github.com/ltdrdata/ComfyUI-Manager.git
https://codeberg.org/Gourieff/comfyui-reactor-node.git
https://github.com/ssitu/ComfyUI_UltimateSDUpscale.git
https://github.com/kijai/ComfyUI-LivePortraitKJ.git
https://github.com/PowerHouseMan/ComfyUI-AdvancedLivePortrait.git
...
Here I declare all the extensions that add new functionality on top of ComfyUI, in particular new NODES, which is why they live in the “custom_nodes” directory, which is a volume external to Docker and therefore persistent, meaning every new extension survives container restarts.
But there’s still a BIG catch: Python Dependencies. A nightmare.
The Docker image build does a bunch of pip install and since I’m using Virtual ENV, everything gets installed in /venv inside the container, as it should.
However, the extensions that get installed outside the build - every time the container restarts - tend to be Python code and also have more dependencies. Extensions are GitHub projects and may be changing right this minute. If they change and you do a git pull to update, you need to run pip install -r requirements.txt. But if you have dozens of extensions, running pip install for each one on every Docker restart takes a long time to do almost nothing. As I said, a nightmare.
My solution - to brag a bit - fixes a good chunk of this maintenance. When the init_extensions.sh script runs, if an extension from the list is already installed, it’ll skip it. Then it’ll write to the ./custom_nodes/.last_commit/*.commit directory the latest commit of each extension. When Docker restarts, it’ll do a git fetch and check whether the latest commit hash has changed.
Only if it has changed will it run pip install for that extension that got an update, and skip all the others that haven’t changed since the last restart, saving A LOT of time and avoiding having to manually update things. Since I’m using VENV, everything will stay persisted in the “/venv” volume. Yes, it’s a VOLUME, because it changes after the build with each extension update.
This way, everything in the image gets copied into that volume, and everything the extensions install on the side also goes into that volume. Every time you restart, it all comes back the way it was. That was the solution I found and so far it seems to work just fine.
But it’s only a matter of time until some poorly made extension installs dependencies that break other dependencies, or an actual case I went through: there was an extension that crashes with no error message if you’re using Python 3.11, the Zoe Depth Map from the comfyui_controlnet_aux extension, one of the packages that seems to be popular.
I hadn’t realized I’d started using a Docker base image of ubuntu22 instead of ubuntu24, I was afraid of using something too new and breaking things, but I ended up using something too old and it broke just the same. Managing versioning is a pain. Anyway, I changed the Dockerfile to ubuntu24.
But in the external VENV volume now there were a bunch of dependencies pinned to Python 3.11. No problem, just delete the volume:
docker compose down # make sure it's stopped
docker volume rm comfyui-venv
rm ./custom_nodes/.last_commits/*.commit
And done, the VENV will start over empty, fill up with the correct Python 3.12 dependencies from the image, and when the container starts my init_extensions.sh script won’t find “.last_commits” and will force a pip install -r requirements.txt of all the extensions, now with Python 3.12. Super clean and reliable.
If even so you get an error, then it might be a bug in a specific extension, just go to its directory in “./custom_nodes” and delete it manually before restarting the container.
I think that’s the least complicated thing you can do in this case. This docker wasn’t built to run on its own on a server, it’s meant to run on your own local machine, where you’re monitoring the terminal output anyway.
Oh yes, if a new version of ComfyUI comes out then you have to rebuild the image and delete the VENV volume. The image is static, don’t forget. Inside, the Dockerfile does a new git clone and grabs the newest commit. Then it’ll install newer python packages, so you need to wipe the VENV volume and have the extensions reinstall their dependencies afterwards too. It’s a huge pain, but that’s just how it works.
Conclusion
With all that done, with a simple docker compose up I can have a stable ComfyUI environment isolated from the rest of my system, without dirtying anything with thousands of dubious dependencies. When I’m done I just do docker compose down or “ctrl-c” in its console and that’s it, my system stays clean.
On top of that, directories like “models” and their 500GB of models stay separate, you can back them up elsewhere if you need to. And if you want to bring it up on another machine, just take only those directories and bring up Docker Compose there and it has to come up exactly the same way, zero-setup. That was my goal in Dockerizing ComfyUI, FramePack, Video2K: to have everything portable, isolated and clean to bring up on any machine later without having to run sketchy installation scripts directly on my machine.
On my X I already showed my ComfyUI working. I loaded some random workflow I found on the Web and look at this:
In this workflow I upload a reference image and I can write a prompt for how I want to transform it:

With ComfyUI I have control over every step of the process, for example, this workflow can separate things like Depth Map and Edge Contour from the original image, to use as context before making the final image, ensuring a much more precise result:

And here’s a result I already got using the “waiNSFIllustrious” model that this workflow suggests, which is a model trained to generate anime-style images (there are dozens, for various different styles).

Switching the model to Mistoon, based on Stable Diffusion (SDXL), here’s another result, with the same prompt, in the same workflow:

And I can keep tuning dozens of parameters inside this workflow, swap vaes, text encoders, controlnets and much more until I get exactly the result I want. That’s the power of ComfyUI and its Custom Nodes and Workflows. That’s what I’ll try to explain the basics of in the next post.